Tuesday, July 5, 2011

2nd Hand sewing machines: Identifying the clutter that comes with them!


Intro:
I recently acquired a Necchi Mira.  It’s a cast iron machine in what’s called a ‘Coronet’ cabinet.  This looks like a small chest of drawers but the front (with three drawer pulls) is actually just a false cover for the bench, which pulls out and away from the usual desk type of cabinet.  The pulls get yanked on over the years (and the seat is purty heavy) and the top one is missing (aargh!).  I doubt I can find a replacement (these have two screws on the back at 2” center) so I’ll probably need to buy a full new set from one of the Home stores (unless one of you can help?).


I digress already: here’s the dilemma:

You have a terrific old SM (sewing machine…some of my pals have written me some very strange replies when I forget to translate that one!) with loads of widgets, clutter, thread and you-name-its in the drawers.  Maybe the previous owner (who is usually the younger female relative of an old lady who died) even donated several shoe-boxes of miscellaneous sewing paraphernalia.  There was probably a clause in the contract that said “No picking, take it all or nothing!”.  So now someone else’s problem has become your own.
You get home and unload it all from the car, which is now rendered sans housing for the unforeseeable future.   You are amazed at the mountain of clutter that lays before you and the sheer volume of large black spiders with hour-glass markings running to the four corners of your formerly tidy domicile.  So you run inside for a swift jar of cooking sherry…yeuch!  You resist the urge to dash out immediately for a fifth of decent vodka.  Instead, you contemplate your folly!

You spend 3 days cutting the thread that’s tangled up between the bobbins, reels, zips and other paraphernalia of a lifetime of messy sewing activity.  Then you spend yet another day prying out rusty pins from the teeny space between bits of wood at the bottom of drawers and the task begins to pall on you.

So, you do the basic tidy, pins, thread and buttons all cleared out and relegated to their particular jars and boxes.  You pause to contemplate adding a wing to your sewing area but crush the thought a-borning lest you lose sight of the awful task at hand.  There remains a great pile of stuff that may or may not belong to this sewing machine, some other sewing machine, the kitchen, the draperies, the hospital, the first edition of the Guttenberg bible etc.

Primal scream!

One could take the easy way out and re-home the SM, leaving everything in the drawer(s) but some of the stuff clearly belongs elsewhere and may even complete another machine (owned by someone else or maybe even you!).

And so…the detective works begins!

I joined the relevant SM on-line group and downloaded the pages of the 90 page manual pertaining to accessories.  I find about half of them and set them aside.

I also found several presser feet with the word ‘Singer’ or ‘Simanco’ stamped on them and a few others which are obviously wrong because they are slant shanks or short shanks (the Necchi Mira is a high shank machine).  So here’s a few photo of the stuff I’m now looking at and cannot identify:  Any help would be gratefully received!


I forgot to put a scale in.  The above instrument is about 3” long and the various ‘needle’ attachments that seem to go with it  are quite fine.  The bit on the left is plastic (was it used to spear an olive at the last party the sewing-lady attended, or is it relevant to this doo-hickey?).  The bit on the right is just a piece of wire (from the box of the chow-mein consumed during the final sewing session?)


The spherical handle on the thing that looks like a screwdriver base is about 1” diameter.  It’s hollow but not magnetic.  The handle turns but the inside handle moves just a hair.

The two vaguely triangular things look like shelf supports but why are they different?  Maybe they fit in a sewing box/base?


The most interesting thing in this collection is that widget on the bottom row, 2nd from left.  There’s a little thing on the pointy end that looks like a tiny crochet hook and a spare one hanging off the handle.

The two bullet-looking things are quite heavy, one has a little bump on the end and the other a little hollow area but they don’t join together.  Are these weights of some kind?

The circular plastic thing in the middle, at left looks nondescript but I’ve seen this before in the drawers of other SMs.

Any thoughts at all, would be appreciated

Kath

Sunday, May 15, 2011

Custom beds for kitty shelters

Fabrics react differently to the same sewing techniques.

This is a very heavy red fleece that a friend donated (thanks Diane!).  It really zings especially with dark colored kitties and it's a dream to work with.  You can see a row of 'top' stitching about 3" in from the outer edges.  It's nice and square (done with ye olde cast-iron Pfaff).
This fabric is a heavy gray jersey knit and the top stitching dragged the fabric and kinda wrecked the look of the bed! Moral: Don't use jersey! Top-stitching is something some animal shelters insist on. It anchors the inside batting so it doesn't shift in the wash. I saw a ginger kitten bouncing around on this bed and he whispered in my ear that he loved it anyway.
The following few beds are enormous.  Some were 3' wide.  The shelter group I was making these beds for uses big cages where kitties are on display during adoption events.  They wanted custom beds so they can cover the entire base of the cages.  You can see here I started off with a central design (lots of mousies chasing kitty appliqué).
Then I realized kitty butt would likely render my handiwork invisible to the doting audience, so I shifted my designs to the corners: Sigh! Well folks, evolution didn't happen in a day either! Note the fake fur on the back of these beds. When one side gets soiled, the beds are reversible. Kitties like the fake fur and it's also kind of amazing how well that stuff stands up to laundry (knocks the heck out of sewing machine needles though: It's like sewing through carpet!).

I made this bed out of thin strips of leftover cotton fabric, donated by another friend.  That starry, spikey stuff kinda zings, don't ya think?  Starry, starry night!
These two weird triangle beds were made for shelves inside the large cages.  The shelves are made of chipboard and anchored high up in a corner of the cages, so I needed to anchor the beds well, in case flying kitties would knock them off and hurt themselves (everybody say 'Ah!').  I put the little straps on so they could be tied to the bars of the cage from the outside.  Have you ever tried to turn spaghetti straps?  It's not for the faint-hearted.  4 hours into that job, I screamed loudly, hurled a chopstick and went back to the sewing machine.  I folded the darned fabric and sewed them down, quick and dirty!

I goofed making these as the triangles are not isosceles and my high-school geometry is not what it was...duh!  So the white fur (being my last remnant, much to my chagrin) ended up on the back of the second one.  Luckily I had a small piece of the red fleece to use on top.
This bed is one of a whole bunch of 24" square beds I made that fit many of the cages.  I had a couple of small pieces of very thick, felty pink fleece and a totally gorgeous piece of 12" square pan velvet (well it's velvet anyway, with an elaborate design on it) in a similar color.  So I framed the velvet and sewed a bunch of mousies around it.  I'm soo proud of this one.  In fact, I think my hat size just went up a tad!  Heck...some stuff just works.

Please also note the cute little label.  I printed these off onto EQ Printables (by Electric Quilt Company) sheets.  It's the premium cotton lawn fabric (so much better to print directly on the fabric than fiddling with that iron-on stuff!).  The nice people at Indygojunction.com were so kind to exchange others I had bought that simply refused to feed through my basic printer.  I'm giving them a plug because the other sheets I had bought were over a year old when I tried (and failed) to use them.  It's rare to find a company that treats customers so well!


Thursday, December 30, 2010

Sewing cat beds for animal shelters

 Another love of my life is cats.  Some other wag said "Cats are magic!" and try as I might, I cannot improve on that.  Cats have their own distinct personalities and we (who are not their 'owners' except as we kid ourselves) are never allowed to forget that.  Yet (in my experience) the great majority of cats freely choose to give abundant affection. [I only ever met two who didn't and both of them had been seriously abused by humans in their kittenhood].  I have been lucky enough to have shared my roof with several cats, now deceased and I miss them profoundly.  I can say, without exception, those felines never gave me cause to weep, except as associated with their own ill-health or death.  I celebrate them, their love, their beauty, their sense of fun and their ineffable magic!

So, in my spare moments, I like to sew for cats.  As I mess about with my sewing machines (often spending hours per bed) I enjoy the work because I am doing it solely for love of cats and a great personal need to not lose my grip on that love.  In truth, I must donate the finished articles to shelters and I have experienced considerable difficulty in finding institutions locally which are 1) willing to even accept them and 2) treat them with just a little consideration for all the work I put into them.


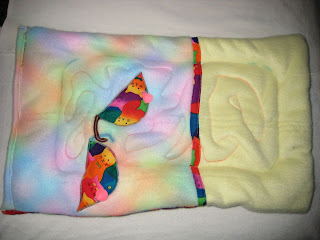
 This one shows my baby steps in trying out 'free motion' work.  The quilter ladies talk much about this technique, so I thought I should give it a try.  I'm still pretty hopeless at this but you can see (by the squiggles) that I'm kinda getting there.  One big problem is the fabric colliding with the pillar thing on the sewing machine.  It forces me to stop and turn the fabric and in so doing, it crimps one's style.


 This is one of my denim beds.  That is delightful stuff to sew on as the stitches seem to enjoy a good 'chew' on the sturdy fabric.  The red bit at the top is also denim and the free-motion work shows up so much better on the solid color.

That's the back of the same bed.  You can see I have a certain affinity for applique work (to put it mildly).  The stark outlines show up nicely even on 'busy' fabric like this daisy-patterned denim.


 One problem with fleece fabric is the tendency to puff up with free motion.  One could use a walking foot to alleviate this effect but sometimes it can look quite cute, or so I console myself.  Also vision is much blocked by the use of those clunky walking feet.

I like to use up odd bits of fabric (I was born with a severe bent towards frugality:  In those days they called it 'mean').  This is an old electric blanket with the wires pulled out.  I cover up holes in the same way.


Sorry about the chalk marks.  The shelter which was the recipient for most of these beds insists on a final 'sew through' seam even though there's nothing inside the beds which could come adrift in the laundry (harumph!).  It kinda ruins the effect of the free motion work, so I tried on this one (rather unsuccessfully) to conform that seam to the existing lines.

A lot of these pieces of fabric are garments gone-wrong or long-since abandoned.  Unfortunately, I think you can still tell...urk!


Look what a splendid piece of Halloween fabric this is!  A darling friend sent me a load of strips and it's amazing how it adds zing to the whole.  I tried my hand at 'quilting' on this one (just parallel [ahem!] lines of stitching over the top.  My hat's off to quilter ladies:  It takes an infinity to achieve that look, even with lines over an inch apart (and fiddling with stupid little quilt guide thingies!).


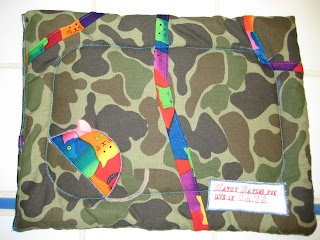
I also got a donation of this camouflage fabric which does absolutely nothing for me.  I often use these brilliantly colored strips to jig-saw together pieces of odd fabric, but in this case I sewed on a few ribbons of the stuff just to satiate my personal lust for color.  Note the little kitty faces on the detail fabric!  Ain't that a kick?  It was a huge free bag of manufacturer's off-cuts that I got in a local garage sale (even before I conceived of making beds for shelter cats!).  If the wonderful woman who thought to rescue that fabric is still out there...thank you!


I've just got to award laurels to modern fabric designers!  What a masterpiece with the little birds and that glorious fruit.  I have sewed slogans on, by the way, to mark the beds since I was told that some of them were disappearing from one of the shelters.  There was no vainglory, in the beginning anyway.  But I am beginning to feel justified in 'signing' my efforts.  I've never done it on cross stitch.  I should give that some thought.


Boring strips of fabric joined on to others that absolutely zing!  I usually sew strips like this onto thin quilt batting to give some heft to the finished item.  It also gives a hint of puffiness to the appliques.  You can see my chalk marks there as I use a cardboard template to try and give at least some orderliness to the angle of turn for those wretched 'top' seams.

Another dear lady gives me bits of leftover quilt batting and I often jigsaw that together too before I even start with the top fabric (great way to use up that wretched cheap thread that I have lying around).

Look at the little hound-doggie heads on that fabric!  I love dogs too but my heart is mostly kittled.  Those top seams do cause a lot of distortion.  I use an ancient cast-iron Pfaff for that job, lest I wreck my more delicate modern machines!


Hey, what use is sewing if one can't do crazy experiments?  I'm not too sure this was one of my success stories (eek, there's a lot of drag along the bottom edge).  What I was attempting here is 'cording'.  There's a little hole in one of those devilishly-engineered presser feet that accepts heavy thread (I used old, waxed top-stitch thread).  This gets pulled along as the machine sews and it lays along the top like a piece of ribbon.  So I zig-zag stitched (narrow stitch width but long stitch length) to anchor it down.  Now I'm worried that kitties may pull it up with their claws. 

Monday, December 27, 2010

Cross Stitch I've done

 I'm new to blogging, so forgive the simplicity of my presentation.  I wanted a place to post some of my finished cross-stitch pieces.  I'm from the UK but have lived in Oregon for the last 3 decades. A lot of my pieces were chosen because I was feeling nostalgic for the old country.  It seems that architecture features strongly in my feelings of homesickness.  I am especially drawn to buildings with some history to them.

I started stitching pieces like this with a view to exorcising that strange sickness of the mind that pulls us back to times gone by and scenes filed away deep in the memory.  The Silhouettes series evokes those sepia postcards of everyday scenes from the early part of the 20th century.

The 'Mermaid' is a Tudor building in Rye, Sussex.  I've never been there but there is a pub in Sheffield (my old home-town) called the 'Old Queen's Head' of which it's reminiscent. 


I've completed a set of these cottages from 'Cross my heart'  This one is Swiss cottage and was the most difficult.


 This is another one in the same series


 This is a big design from a Cross my Heart booklet of several.  It was hard to do and took ages!  It's now on my footstool


This is one I'm currently working on.  It's a Kinetic kit called Mermaid Inn, Rye.  It's a monster and is approaching the half-way point


This is one of the Silhouettes by Heritage designs.  I've done loads of these.  This is a lock scene


Another Silhouettes design and my favorite.  It's called 'tram stop'